 |
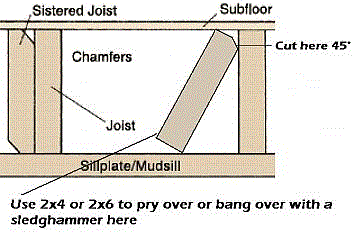
| Sistering a joist |
Wright starts off with a bang: apparently the U of Cincinnati J-school does a good job of teaching students how to copy-reword-paste:
"When remodeling a home, you may find that a floor joist needs to be replaced. Finding damaged joists in older homes is a common occurrence. A damaged floor joist can cause the floor to be weakened and fail if it isn't remedied. Before replacing a floor joist, you need to know what damaged it."We're not really sure why Wright thinks this is part of a remodeling process, but we'll let that stand. After that intro, she launches into her procedure. If Dakota had ever actually attempted this process (or had done better research), however, she might have known that she wasn't explaining how to replace a joist, she was explaining how to sister it: leave a damaged joist in place and add a "jacket" of undamaged joists to take the weight.
In her rewording process, Wright makes it quite clear that she has no idea what she's talking about (par for the course for eHow writers, in our experience). Among the other bull she published in the article, we found the instruction"Check for cracks in the crawl space perimeter or above a floor joist that shows water damage.""Cracks in what?" we wondered. Did Wright mean literal cracks? or did she mean openings where water can penetrate? inquiring minds want to know. But it's when she gets to installing the sisters (a word Dakota never uses, BTW) that her ignorance shines most brightly. Here's the order in which Dakota wants you to complete the task: |
- Line up the new joist next to the old joist. Lift it into position... slip a joist hanger onto each end... [hammer] 16d nails [emphasis ours] into each hole in the joist hanger."
- "Insert the second replacement on the other side of the old joist."
- "Position [a hydraulic] jack... under the break in the joist. Jack up the joist slowly, repositioning it as you go."
- "Apply wood glue to the replacement joist to minimize the squeak of new wood and create a tighter bond. Nail the second replacement joist to the original joist."
So many questions, so few useful answers. It's no wonder that our home repair specialists flagged this crap for consideration, and it should be no wonder either that Dakota Wright is our Dumbass of the Day. Heaven help anyone dumb enough to think this is good advice: they're probably gonna fall through their floor when they're done. Oh, and by the way? Wright never bothered to say this isn't "replacing" a joist... idiot.
¹ The original has been deleted by Leaf Group, but can still be accessed using the Wayback machine at archive.org. Its URL was ehow.com/how_6559163_replace-floor-joists.html
copyright © 2016-2022 scmrak
DDIY - FLOORS
No comments:
Post a Comment