 |
| There's more to a bay window roof, Sharon... |
Like Ramirez before her, Penn seemed to think that the OQ wanted to retrofit a bay window in place of... something else. Sharon's problem, we think, was a combination of failure to think the problem through and garden-variety ignorance of what she was telling people to do. According to Sharon, your sequence of steps (for remodeling, at least) was as follows:
- Pull permits.
- Mark the outline of the new window and remove the old one. According to Sharon, that second part consists of, "Remove the existing window by removing the sash stops, sash and tracks..."
- Enlarge the opening thusly: "Use a circular saw to cut through the existing studs. Build the window frame according to the specifications of the building code by installing a header at the top and a sill at the bottom. Install studs and blocks for support."
- "Install support braces to the rough window sill to secure the window. Lift the center window into place on top of the support braces. Use shims to level the window and screw the window into the frame."
- Add a roof like this: "Construct the roof frame and nail it to the bay window frame. Install plywood decking and fill the space between the roof frame and the window with insulation. Attach roof sheeting to the top and add roofing paper. Attach shingles in an overlapping pattern."
- And finally, waterproof everything by applying "...caulking around the edges of the bay window to make it airtight and waterproof."
To which the uninitiated (people like Penn and Ramirez) might say, what's wrong with that? Well, Penn left stuff out and she botched what she did write. Perhaps it was because her sole (claimed) reference was nothing but a diagram of window framing... and perhaps because she wrote this three years after Ramirez's version (hint, hint). Here are some of Sharon's goofs:
- She got the permitting part right. Yay, Sharon.
- She didn't mention that those measurements are for the rough opening, not the window complex itself. You'll also want to remove the casing molding, inside and out, as well as the stool and other parts.
- You'd darned well better check to see if this is a bearing wall before cutting any studs. Sharon also forgot to mention stripping off the siding to allow for the window (and roof) and the drywall on the interior. Oops. You also build framing according to the plan specs, not (just) the "code."
- This must be instructions for a pre-formed bay window; but it is interesting that she only gave instructions for "the center window" and didn't mention the sidelights...
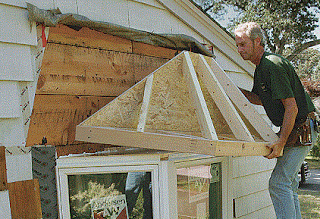
- We'd like to think that someone who knew the topic would mention anchoring the rood to the outer wall of the building (see image above)... plus, you're gonna need flashing under those shingles, Sharon.
- She never mentioned finishing the interior or the exterior.
No, folks, regardless of her M. Ed. or great golf chops; this freelancer knew squat about installing any window, much less a bay window. We hand out Dumbass of the Day awards like Hallowe'en candy for people who write bullshit like this!
DDIY - WINDOWS
No comments:
Post a Comment