Some of the most horrendous alleged do-it-yourself plans for woodworking projects have slithered off the pages of the former eHow.com... straight onto niche sites (belonging to the same company) the likes of OurPastimes.com and HomeSteady.com. Face it: if you ask some art history major how to build a piece of furniture for storage, chances are pretty good that said art history major lacks even the slightest experience in that particular project. Well, at least the chances look pretty darned good that Madeleine Baber had never tackled "How to Make a Foot Locker" before she barfed up her set of supposed instructions at HomeSteady.com.
Baber started by prattling that, at least in her (nonexistent) experience,
"Making a foot locker is a relatively easy task that requires little building experience and few materials..."
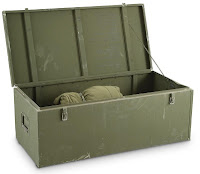
...a claim about which we have considerable objection. Begin by considering a typical foot locker, as depicted above: even the most rudimentary design has a frame, handles, reinforced corners, and some sort of interior compartments. The parts list¹ for Madeleine's version of a foot locker, however, consisted of
- Four pieces of plywood measuring 4 feet x 2 feet
- Two pieces of plywood measuring 2 feet x 2 feet
- Nails
- Two Hinges
Never mind that Baber didn't specify thickness of the plywood or that her "plans" didn't allow for the thickness of the materials, consider the fact that you do not assemble plywood with nails! No, Madeleine wanted her readers to,
"Take one 4-foot-by-4-foot piece of wood²... Apply wood glue to one of the 2-foot edges of the 4-foot-by-2-foot piece of wood. Place one of the 2-foot-by-2-foot pieces of wood at the edge you just glued, forming a right angle... After the glue has bonded, hammer in four nails, one at each corner, and one six inches from each corner. Repeat this for the other 2-foot-by-2-foot piece of wood on the other side. Attach two of the remaining larger pieces of wood in the same manner, so that you have a wooden 'tub...'"
|
Yup, that's how Baber thought you'd assemble a foot locker. But wait until you hear how she wanted to add a lid!
"Place the two hinges six inches from the corner, on the same side of the open part of the box. Hammer them in [sic], ensuring that they both are facing the same way... nail the remaining piece of wood (the lid) to the hinges." Maybe those plans would work for a box a few inches on a side that was intended for burying a gerbil, but a footlocker? Hell, the bottom would fall off the first time you picked it up – if you could pick it up, since there are no handles!
|
No, Baber had no friggin' idea how to build a secure, sturdy foot locker which is, after all he purpose of a foot locker. The piece of rubbish our Dumbass of the Day tried to design has no handles, doesn't latch closed, and would be so flimsy that you couldn't carry rolls of toilet paper in it. Feh.
¹ Leaf Group cut off her list of "Things You'll Need" when they niched Baber's post; we found it in the original using the Wayback Machine at archive.org.
² You read that right: there was no 4-by-4 piece in Baber's parts list.
² You read that right: there was no 4-by-4 piece in Baber's parts list.
DDIY - STORAGE

No comments:
Post a Comment